

The process of quality control in manufacturing often calls for tools that quickly and efficiently measure components to ensure they fall within accepted tolerance levels.

One of the most popular tools for this purpose is the Go/No-Go gauge.
These gauges are designed to check a workpiece against its allowed tolerances, effectively providing an immediate verdict: it’s either a “go” (the piece is within tolerance and acceptable) or a “no-go” (the piece exceeds tolerance and is not acceptable).
Let’s delve deeper into how these gauges function and how they can be correctly used.
Basics of Go/No-Go Gauges
What are Go/No-Go Gauges?
Go/No-Go gauges are inspection tools used predominantly in manufacturing and production to determine the acceptability of a part or component. They are precision-made tools that verify dimensions and ensure consistency.
Types of Go/No-Go Gauges
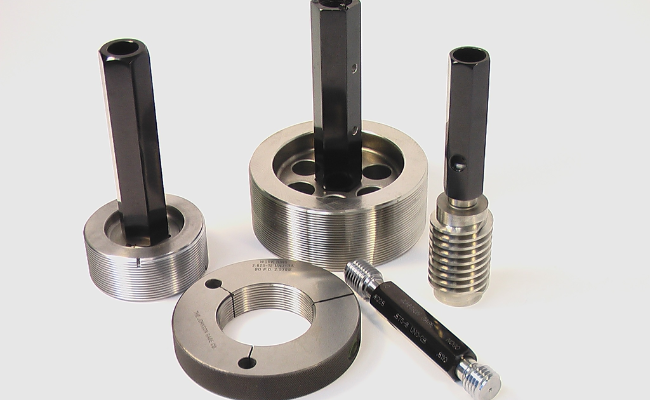
The most common types of these gauges are plug gauges and ring gauges. Plug gauges are used to test internal diameters, while ring gauges are designed for external dimensions.
- Plug Gauges: Plug gauges are among the most commonly utilized types of Go/No-Go gauges, designed specifically for assessing internal dimensions. They usually come with a cylindrical design. The “Go” end is structured to match the minimum allowable hole size, and the “No-Go” end matches the maximum permissible hole size.
- Ring Gauges: Ring gauges serve the opposite purpose of plug gauges. They are developed to measure external dimensions of cylindrical objects, such as shafts. If a shaft slides through the “Go” end of a ring gauge but doesn’t fit into the “No-Go” end, the shaft is within specification.
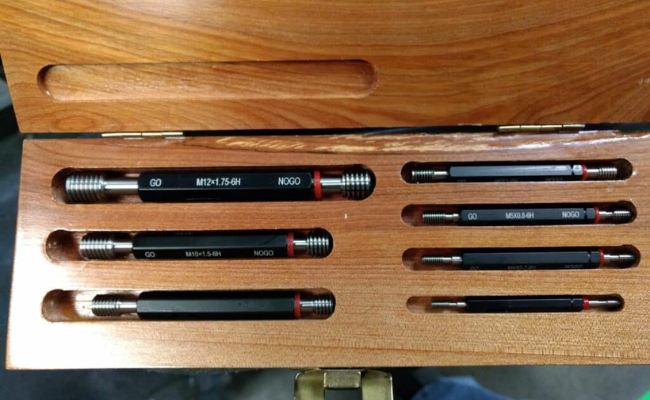
- Thread Gauges: These are special types of Go/No-Go gauges designed exclusively for assessing threaded parts. Thread gauges are crucial in industries where the precision of screw threads is essential, such as automotive and aerospace. They ensure that the threads are correctly sized and properly pitched.
- Snap Gauges: Snap gauges are versatile instruments that can assess the diameter of a round or an out-of-round workpiece. They operate by “snapping” into place around the component, letting you discern quickly if it’s within specified tolerances.
- Disc Gauges: While less common, disc gauges are used for measuring slots and grooves. They have a precise thickness corresponding to the minimum and maximum tolerance of the slot or groove. When the disc slides into the groove, it indicates that the slot is within acceptable limits.
- Limit Gauges: These are a combination of two or more types of gauges, providing a consolidated solution for measuring multiple dimensions or features of a single part. For instance, a single tool might combine a plug gauge and a ring gauge for parts that need both internal and external measurements.
The Importance of Calibration
Regular calibration is crucial. Over time, even high-quality tools can wear out or get damaged. Regularly checking and recalibrating ensures the gauges provide accurate results.
- Ensuring Accuracy: Calibration ensures that Go/No-Go gauges deliver the exactness required for precision measurements. Over time, even minor wear and tear can impact a gauge’s accuracy. Regular calibration ensures that the gauge continues to measure within its designated specifications, eliminating costly errors or oversights in the manufacturing process.
- Maintaining Consistency: For manufacturers, consistency is the cornerstone of quality. When a gauge is regularly calibrated, it provides consistent results. This consistency ensures that all products or parts measured with the gauge will meet the required standards, leading to uniformity in production batches.
- Prolonging Gauge Life: Calibration often involves checking for wear and tear, damages, or other anomalies. By identifying and addressing these issues early on, you not only ensure the tool’s accuracy but also prolong its life. By maintaining your tools well, you save costs in the long run by avoiding premature replacements.
- Upholding Compliance: In many industries, adhering to specific regulations and standards is non-negotiable. Regular calibration ensures that your gauges meet the necessary industry standards, which can be crucial for audits, certifications, and regulatory compliances. By keeping your gauges calibrated, you ensure that your manufacturing processes remain compliant with industry norms.
- Building Trust: When customers and partners know that you prioritize tool calibration, it builds trust. It indicates that you are dedicated to delivering quality products, as you take the necessary steps to ensure measurement accuracy. This commitment to quality can differentiate your business in a competitive marketplace.

Material Considerations
These gauges are usually made of hardened tool steel because of its durability. However, for softer materials, plastic or other composites might be used to prevent damage during testing.
Reading the Gauges
Reading these tools is straightforward: if the “go” end fits and the “no-go” end does not, the part is considered within the tolerance range.
Steps to Using Go/No-Go Gauges
Preparation
Start by cleaning the gauge and the part to be measured. Any debris can affect accuracy. Also, ensure that the gauge is calibrated and fit for use.
Cleaning
Before initiating any measurement, it’s paramount to ensure that both the gauge and the part being measured are clean. Residual oils, dirt, or debris can lead to inaccurate results. Using a soft, lint-free cloth is often adequate, but in certain industries, you might need specialized cleaning solutions.
Inspection
Inspect the gauge visually to check for any signs of wear, damage, or deformity. Using a compromised tool will lead to false readings.
Calibration Check
Ensure that the gauge has been recently calibrated. If not, it may be prudent to have it calibrated or at least verified against a known standard.
Identification
Make sure you are using the correct gauge for the measurement. Misidentifying can lead to incorrect assessments.
Gauge Selection
Before using a gauge, verify that you’ve selected the correct one for the measurement in question. Different parts or components might require different gauges, each with its own set of tolerances.
Gauge Orientation
Some gauges, especially thread gauges, might have a specific orientation. Ensure that you’re using the gauge in the correct manner to avoid false readings.
Testing with the ‘Go’ End
Insert the ‘Go’ end into the part. If it goes in without resistance, it means the part is at least as big as the minimum acceptable size.
Gentle Insertion
When introducing the ‘Go’ end to the part, it’s essential to do so gently. Forcing the gauge can damage both the tool and the component.
Proper Fit Verification
The ‘Go’ end should fit into or onto the part without excessive force. If it fits smoothly, it indicates that the part meets the minimum tolerance level.
Removal
Once the test with the ‘Go’ end is complete, carefully remove the gauge to prepare for the ‘No-Go’ test.
Testing with the ‘No-Go’ End
Try inserting the ‘No-Go’ end. If it doesn’t fit, it’s a sign that the part hasn’t exceeded the maximum tolerance. However, if it fits, the part is out of specification.
Careful Introduction
Just like with the ‘Go’ end, introduce the ‘No-Go’ end gently. The aim here is to see if the part exceeds the maximum allowable tolerance.
Interpretation
If the ‘No-Go’ end doesn’t fit, it’s a clear sign that the part is within the desired specifications. However, if it does fit, then the part has exceeded its tolerance and might be rejected.
Interpretation
Using both ends gives a clear picture of whether the part is within tolerance. Remember always to test with the ‘Go’ end before the ‘No-Go’ end.
Record Findings
Whether the part passed or failed the test, document the findings. This documentation is vital for quality control and future audits.
Interpretation
Using both the ‘Go’ and ‘No-Go’ tests will provide clarity on the acceptability of the part. If the part passed the ‘Go’ test but failed the ‘No-Go’ test, it’s within the desired tolerance range.
Decision Making
Based on the results, decide on the next steps. Parts that pass can proceed to the next stage of manufacturing or assembly, while those that fail might need reworking or disposal.
Tips for Proper Gauge Care
Go/No-Go gauges, like all precision instruments, require meticulous care to ensure they remain in optimal condition and continue to provide accurate readings. Here’s a deeper dive into some of the crucial practices that should be adhered to for the maintenance and care of these vital tools.
Proper Storage
Storing these tools correctly is paramount. They should be kept in protective casings to shield them from dirt, debris, and accidental damage.
Protective Casing
Always store gauges in their original or recommended protective casing. These casings are designed to protect the tools from environmental factors and potential physical damages.
Humidity and Temperature
Ensure that gauges are stored in a place where humidity and temperature levels are controlled. Fluctuations in these factors can lead to material expansion or contraction, affecting the gauge’s precision.
Isolate from Corrosive Elements
Avoid storing gauges near corrosive substances or in environments where they might be exposed to corrosive gases. This will prevent premature wear and potential damage to the tool.
Avoid Dropping
Dropping these precision tools can compromise their accuracy. Always handle them with care.
Handling with Care
Always handle the gauges with utmost care. Even minor falls or impacts can misalign or damage these precision tools, leading to inaccurate readings.
Designated Workspaces
When using the gauge, ensure you’re working on a stable surface, free from clutter, which can minimize the risk of accidental drops.
Cleaning
After every use, wipe down the gauge to remove any debris or oils. Some professionals use specialized cleaning solutions, but a clean, lint-free cloth often suffices.
After Each Use
It’s a best practice to clean the gauge after each use. This not only removes any immediate debris or oils but also prevents the accumulation of contaminants over time.
Suitable Cleaning Solutions
While a lint-free cloth often does the trick, in some cases, a mild cleaning solution might be needed, especially if the gauge has been exposed to sticky or oily substances. Ensure any cleaning solutions used are compatible with the gauge’s material.
Avoid Force
Never force a gauge into a part. If you’re using excessive force, it’s either the wrong tool or the part is way out of specification.
Gentle Application
Never force a gauge into a part. Not only can this damage the gauge, but it can also compromise the component being measured.
Proper Technique
Ensure that everyone using the gauge is trained in the correct technique. Proper insertion and removal practices can significantly reduce the chances of damaging the tool.
Regular Inspections
Inspect the gauges for wear, damage, or any signs of deformity. This will ensure consistent and accurate results.
Visual Checks
Before and after using the gauge, it’s prudent to do a quick visual check. Look for signs of wear, corrosion, or any other anomalies.
Professional Inspection
Depending on the frequency of use and the tool’s criticality, consider having it professionally inspected periodically. This can identify potential issues before they become significant problems.
Calibration
While already emphasized, it’s worth reiterating that regular calibration is an integral part of gauge care. This not only ensures the gauge’s accuracy but also its overall health.

Advantages of Using Go/No-Go Gauges
Time Efficiency
These gauges provide immediate results, making them much faster than many other measuring tools.
Ease of Use
With a bit of training, even novices can use these tools effectively. Their binary nature (go or no-go) simplifies decision-making.
Cost-Effective
While there’s an initial investment, over time, these tools prove cost-effective due to their durability and speed of operation.
Reducing Errors
The simplicity of these gauges reduces the chances of human error, ensuring more consistent quality control.
Enhanced Quality Control
By ensuring parts are consistently within tolerance, these gauges uphold high manufacturing standards, leading to better end products.
Limitations and Considerations

Not for Detailed Measurements
These gauges don’t provide exact measurements but only determine if a part is within the set tolerances.
Wear and Tear
Frequent use can wear out gauges, especially if used on abrasive materials. Regular calibration and inspections are necessary.
Training
While they are user-friendly, proper training ensures that operators use the gauges correctly, ensuring the reliability of results.
Environment
Temperature and humidity can affect measurements. It’s essential to consider environmental conditions when interpreting results.
Not Universal
Different manufacturing requirements will necessitate different gauges. It’s vital to have a diverse set if working across various specifications.
Conclusion
Go/No-Go gauges are indispensable tools in the manufacturing world, ensuring the consistent quality of products. Proper usage and maintenance of these tools are vital for their longevity and the accuracy of their results.
By understanding their operation, care requirements, advantages, and limitations, professionals can harness their full potential, upholding manufacturing excellence.